Useful Tricks
此页内容多为软件使用技巧,绝大部分内容来自互联网,如有侵权,请与我联系。也有部分内容系自己使用软件所得的一些经验,仅供参考。
FFmepg
转视频为gif
1 | ffmpeg -i input.mkv out.gif |
又:加速播放。假设原视频 60 fps,输出降到 30 fps,丢掉一半的帧。1
ffmpeg -r 60 -i input.mkv -r 30 out.gif
又:不想丢帧。将输入扩大一倍,输出保留原样。1
ffmpeg -r 120 -i input.mkv -r 60 out.gif
又:不想全转。从视频的第2秒开始,截取3秒转化为gif。1
2## 从视频中第二秒开始,截取时长为3秒的片段转化为 gif
ffmpeg -t 3 -ss 00:00:02 -i input.mkv out-clip.gif
又:控制转化质量。1
2## 默认转化是中等质量模式,若要转化出高质量的 gif,可以修改比特率
ffmpeg -i input.mkv -b 2048k out.gif
ImageMagick
图片转换
转换图片为指定分辨率。1
convert -resize 1920x1080 src.jpg dst.jpg
又:按百分比转换大小。1
convert -resize 50%x50% src.jpg dst.jpg
又:忽略原始宽高比。1
convert -resize 300x300! src.jpg dst.jpg
Shell
行内操作
^a: jump to BOL^e: jump to EOL^u: delete the line^k: delete to EOL^w: delete a word forwardalt+f: jump a word forwardalt+b: jump a word backward^r: search historyalt+.: complete second parameter
任务控制
- 执行
command - 按
^z挂起当前job - 按
bg后台继续该job - 按
fg召回前台
后台运行命令
1 | command & |
或者如果你不想看到任何输出,使用1
command &> /dev/null &
- 如此你可以继续使用当前shell
- 使用
bg查看是否有任务在后台运行 - 使用
jobs查看后台任务 - 使用
fg将任务召回前台 - 不能退出shell,否则进程会被杀掉
- 使用
disown丢掉进程,可以退出shell
又:1
nohup command &> /dev/null &
等价于以上的操作。单纯的nohup command会在当前目录创建一个隐藏文件以写入命令的输出。以上命令将程序的输出重定向至比特桶丢弃。
Command find
1 | $ find --help |
前面的选项不常用,初级使用只需掌握1
find [path...] [expression]
path- search pathexpression- expands to-options [-print -exec -ok]-options: 指定find常用选项-print: 将匹配到的文件写入标准输出[默认]-exec: 在匹配到的文件上执行一串命令。格式为<command> {} \;,注意 {} 和 \; 之间的空格。find . -size 0 -exec rm {} \;- 删除当前目录下size为0的文件rm -i $(find . -size 0)- 同上find . -size 0 | xargs rm -f &- 同上
-ok: 同上,执行命令前会询问
常用选项
- name - 按照文件名查找
find <dir> -name "*.cpp": 在目录dir下查找后缀为cpp的文件
- perm - 按照文件权限查找
- user - 按照文件所有者查找
- group - 按照文件所有组查找
- type - 按照文件类型查找
- size - 按照文件大小查找
- …
几个例子
find . -name "*name*"- 找出当前文件夹文件名包含“name”的文件find . ! -type d -print- 在当前目录查找非目录文件find . -newer file1 ! file2- 查找比file1新但比file2旧的文件
Command grep
Command sed
Git
使用 git log 查看提交历史,但是输出冗杂。通常使用1
git log --oneline --abbrev-commit --all --graph --decoreate --color
来获得更美观易读的输出。但是每次输入这么多肯定很烦人,使用1
git config --global alias.graph "log --graph --oneline --decorate=short"
增加一个全局别名,这个别名对于任何地方的 git 都适用。如此一来,键入 git graph 会等效于1
git log --graph --oneline --decorate=short
样例输出:1
2
3
4
5
6
7
8
9$ git graph
* 36f2d65 (HEAD -> master, origin/master, origin/HEAD) Forget it
* 9b4a6d7 Update ref list
* 3931d4d Using relative path for image
* ba18821 Upload pics
* ceca69a fixed reference
* be15df2 fixed picture address
* 97a36f3 Initial commit
忽略已经添加的文件1
git rm --cached <somefiles>
Command g++
自定义包含路径1
g++ main.cpp -I/usr/local/include
自定义链接静态或动态库1
2g++ main.cpp -L/path/to/lib_file
g++ main.cpp -L/usr/lib64 -lcurl -lssl
上面第二个命令链接了/usr/lib64/目录下的libcurl.so和libssl.so两个动态库文件。静态库也是同样链接。说起来静态库,想起了最近折腾的一个东西,你可能会想把多个静态库合成一个静态库,想当然的直接用ar合并,但是不行,必须要把两个静态库全解压出来,再合并所有的object file. 参见:here
生成机器码1
g++ main.cpp -c
生成汇编代码1
g++ main.cpp -S
Aria2c
aria2c 是个好东西。
配置:参考 aria2配置示例
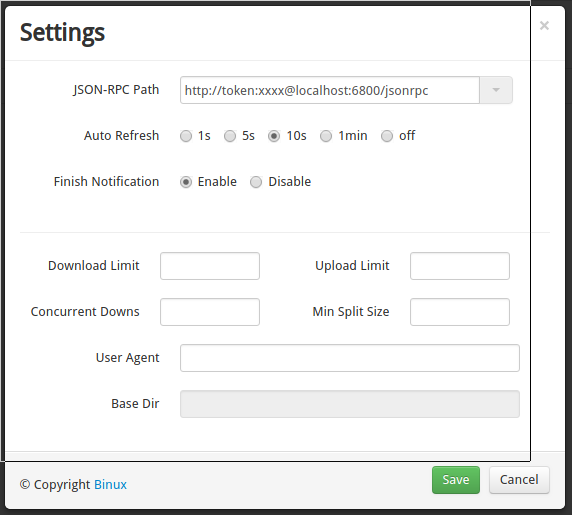
webui:
Note: jsonrpc 地址格式为 http://token:<rpc-secret>@hostname:port/jsonrpc
令牌填写自己设置的 rpc-secret

xxx 替换为自己设置的 rpc-secret

HTML
给网页添加BGM。1
<embed src="bgm.mp3" autostart="true" loop="true" width="300" height="20" hidden="true">
又,添加可以控制播放的音乐。1
<audio autoplay="autoplay" controls="controls" loop="loop" preload="auto" src="music.mp3">Your browser doesn't support H5 audio flag!</audio>
使用xrandr设置多屏显示
1 | $ xrandr |
观察输出可知,连接了两个显示器(eDP-1, HDMI-2),其中eDP-1是主显示器。如果第二块屏幕无显示,执行下面的命令。1
xrandr --output HDMI-2
又,指定分辨率为1920x1080,1
xrandr --output HDMI-2 --mode 1920x1080
又,设置为右侧扩展屏,即光标向右可移动至第二块屏,1
xrandr --output HDMI-2 --right-of eDP-1
又,连接上第二块屏,想关掉内置显示屏,(警告:不要随便关掉内置屏)1
xrandr --output eDP-1 --off
又,开启内置屏。1
xrandr --output eDP-1 --auto
网络
查看被监听端口1
netstat -tulpn | grep LISTEN