__    __               __           __               ____    ___                       
/\ \  /\ \             /\ \      __ /\ \             /\  _`\ /\_ \                      
\ `\`\\/'/__  __    ___\ \ \___ /\_\\ \/      ____   \ \ \L\ \//\ \     ___      __     
 `\ `\ /'/\ \/\ \  /'___\ \  _ `\/\ \\/      /',__\   \ \  _ <'\ \ \   / __`\  /'_ `\   
   `\ \ \\ \ \_\ \/\ \__/\ \ \ \ \ \ \      /\__, `\   \ \ \L\ \\_\ \_/\ \L\ \/\ \L\ \  
     \ \_\\/`____ \ \____\\ \_\ \_\ \_\     \/\____/    \ \____//\____\ \____/\ \____ \ 
      \/_/ `/___/> \/____/ \/_/\/_/\/_/      \/___/      \/___/ \/____/\/___/  \/___L\ \
              /\___/                                                             /\____/
              \/__/                                                              \_/__/ '`

此页内容多为软件使用技巧,绝大部分内容来自互联网,如有侵权,请与联系。也有部分内容系自己使用软件所得的一些经验,仅供参考。

FFmepg

转视频为 gif

1
ffmpeg -i input.mkv out.gif

又:加速播放。假设原视频 60 fps,输出降到 30 fps,丢掉一半的帧。

1
ffmpeg -r 60 -i input.mkv -r 30 out.gif

又:不想丢帧。将输入扩大一倍,输出保留原样。

1
ffmpeg -r 120 -i input.mkv -r 60 out.gif

又:不想全转。从视频的第 2 秒开始,截取 3 秒转化为 gif。

1
2
## 从视频中第二秒开始,截取时长为 3 秒的片段转化为 gif
ffmpeg -t 3 -ss 00:00:02 -i input.mkv out-clip.gif

又:控制转化质量。

1
2
## 默认转化是中等质量模式,若要转化出高质量的 gif,可以修改比特率
ffmpeg -i input.mkv -b 2048k out.gif

VOB 转 MP4

cf. http://www.ruhuamtv.com/thread-9782-1-1.html

1
ffmpeg -i 源视频.vob -c:v libx264 -vf yadif -crf 18 目标视频.mp4

又:合并 VOB 文件。

1
cat VTS_01_1.VOB VTS_01_2.VOB | ffmpeg -y -i - -fflags genpts -vcodec copy -acodec copy ../output.VOB

又:合并 mp4 文件。 see: https://www.tais3.com/others/983.html

 1
 2
 3
 4
 5
 6
 7
 8
 9
10
#! /bin/bash
# 将 mp4 文件封装为 ts 格式
ffmpeg -i a1.mp4 -vcodec copy -acodec copy -vbsf h264_mp4toannexb 1.ts
ffmpeg -i a2.mp4 -vcodec copy -acodec copy -vbsf h264_mp4toannexb 2.ts
ffmpeg -i a3.mp4 -vcodec copy -acodec copy -vbsf h264_mp4toannexb 3.ts
ffmpeg -i a4.mp4 -vcodec copy -acodec copy -vbsf h264_mp4toannexb 4.ts
# 拼接 ts 并导出最终 mp4 文件
ffmpeg -i "concat:1.ts|2.ts|3.ts|4.ts" -acodec copy -vcodec copy -absf aac_adtstoasc output.mp4
# 删除过程中生成的 ts 文件
rm *.ts

参考:FFMPEG 合并视频文件(无损)

TS 转 MP4

1
ffmpeg -y -i your_file.ts -vcodec copy -acodec copy -map 0:v -map 0:a your_file.mp4

cf.

  1. https://www.reddit.com/r/ffmpeg/comments/ggmjep/comment/fq2m1ux/?utm_source=share&utm_medium=web2x&context=3
  2. https://askubuntu.com/a/716457

分辨率、码率、帧率相关介绍,及相关压缩方法:

  1. https://blog.csdn.net/weixin_30536861/article/details/114496746
  2. https://zhuanlan.zhihu.com/p/255042580

写给新手的指令:https://gnu-linux.readthedocs.io/zh/latest/Chapter04/00_ffmpeg.basic.html


ImageMagick

图片转换

转换图片为指定分辨率。

1
convert -resize 1920x1080 src.jpg dst.jpg

又:按百分比转换大小。

1
convert -resize 50%x50% src.jpg dst.jpg

又:忽略原始宽高比。

1
convert -resize 300x300! src.jpg dst.jpg

又:多张图片合成 gif。

1
2
magick DSC_52{01..09}.JPG out.gif
magick -delay 10 *.jpg out.gif  # 指定每张持续 10ms

又:更改分辨率。

1
mogrify -resize 50%x50% *.jpg  # 所有 jpg 缩放至 50%,不加百分号默认单位 px(像素)

又,裁切 gif。

1
2
#
magick c.gif -coalesce -repage 0x0 -crop 600x600+175+0 +repage output.gif
1
convert input.gif -coalesce -repage 0x0 -crop WxH+X+Y +repage output.gif
  • Animated gifs are often optimised to save space, but imagemagick doesn’t seem to consider this when applying the crop command and treats each frame individually. -coalesce rebuilds the full frames.
  • Other commands will take into consideration the offset information supplied in the original gif, so you need to force that to be reset with -repage 0x0.
  • The crop itself is straightforward, with width, height, x offset and y offset supplied respectively. For example, a crop 40 wide and 30 high at an x offset of 50 = 40x30+50+0.
  • Crop does not remove the canvas that it snipped from the image. Applying +repage after the crop will do this.

cf. https://stackoverflow.com/a/14036766


Shell

行内操作

  • ^a: jump to BOL
  • ^e: jump to EOL
  • ^u: delete the line
  • ^k: delete to EOL
  • ^w: delete a word forward
  • alt+f: jump a word forward
  • alt+b: jump a word backward
  • ^r: search history
  • alt+.: complete second parameter

任务控制

  1. 执行command
  2. ^z挂起当前 job
  3. bg后台继续该 job
  4. fg召回前台

后台运行命令

1
command &

或者如果你不想看到任何输出,使用

1
command &> /dev/null &
  • 如此你可以继续使用当前 shell
  • 使用bg查看是否有任务在后台运行
  • 使用jobs查看后台任务
  • 使用fg将任务召回前台
  • 不能退出 shell,否则进程会被杀掉
  • 使用disown丢掉进程,可以退出 shell

又:

1
nohup command &> /dev/null &

等价于以上的操作。单纯的nohup command会在当前目录创建一个隐藏文件以写入命令的输出。以上命令将程序的输出重定向至比特桶丢弃。

同时输出到 console 和文件

将命令输出重定向到文件:

1
2
SomeCommand > SomeFile.txt  # overwrite
SomeCommand >> SomeFile.txt # append

将命令输出 (stdout) 及报错 (stderr) 重定向到文件:

1
2
SomeCommand &> SomeFile.txt
SomeCommand &>> SomeFile.txt

同时输出到 console 和文件:

1
2
SomeCommand 2>&1 | tee SomeFile.txt     # overwrite
SomeCommand 2>&1 | tee -a SomeFile.txt  # append
          || visible in terminal ||   visible in file   || existing
  Syntax  ||  StdOut  |  StdErr  ||  StdOut  |  StdErr  ||   file
==========++==========+==========++==========+==========++===========
    >     ||    no    |   yes    ||   yes    |    no    || overwrite
    >>    ||    no    |   yes    ||   yes    |    no    ||  append
          ||          |          ||          |          ||
   2>     ||   yes    |    no    ||    no    |   yes    || overwrite
   2>>    ||   yes    |    no    ||    no    |   yes    ||  append
          ||          |          ||          |          ||
   &>     ||    no    |    no    ||   yes    |   yes    || overwrite
   &>>    ||    no    |    no    ||   yes    |   yes    ||  append
          ||          |          ||          |          ||
 | tee    ||   yes    |   yes    ||   yes    |    no    || overwrite
 | tee -a ||   yes    |   yes    ||   yes    |    no    ||  append
          ||          |          ||          |          ||
 n.e. (*) ||   yes    |   yes    ||    no    |   yes    || overwrite
 n.e. (*) ||   yes    |   yes    ||    no    |   yes    ||  append
          ||          |          ||          |          ||
|& tee    ||   yes    |   yes    ||   yes    |   yes    || overwrite
|& tee -a ||   yes    |   yes    ||   yes    |   yes    ||  append

Ref:

  1. https://askubuntu.com/questions/420981/how-do-i-save-terminal-output-to-a-file
  2. https://www.gnu.org/software/bash/manual/bash.html#Redirections

从系统中踢出某个用户

 1
 2
 3
 4
 5
 6
 7
 8
 9
10
11
# See the pid of the user's login process.
$ who -u
yychi    tty1         2020-02-19 21:06  旧        460

# Let him know he will be kick off.
$ echo "You'll be kick off by system administrator." | write yychi

# Kick off.
$ kill -9 460

# Done.

Ref: https://www.putorius.net/kick-user-off-linux-system.html


Command find

1
2
$ find --help
Usage: find [-H] [-L] [-P] [-Olevel] [-D help|tree|search|stat|rates|opt|exec] [path...] [expression]

前面的选项不常用,初级使用只需掌握

1
find [path...] [expression]
  • path - search path
  • expression - expands to -options [-print -exec -ok]
    • -options: 指定 find 常用选项
    • -print: 将匹配到的文件写入标准输出 [默认]
    • -exec: 在匹配到的文件上执行一串命令。格式为<command> {} \;,注意 {} 和 ; 之间的空格。
      • find . -size 0 -exec rm {} \; - 删除当前目录下 size 为 0 的文件
      • rm -i $(find . -size 0) - 同上
      • find . -size 0 | xargs rm -f & - 同上
    • -ok: 同上,执行命令前会询问

常用选项

  • name - 按照文件名查找
    • find <dir> -name "*.cpp": 在目录 dir 下查找后缀为 cpp 的文件
    • -name默认不支持正则表达式,顶多支持通配符*
  • perm - 按照文件权限查找
  • user - 按照文件所有者查找
  • group - 按照文件所有组查找
  • type - 按照文件类型查找
  • size - 按照文件大小查找

正则表达式

1
find path -regex "<regex>"

但是默认的正则表达式引擎我也不知道是啥,反正不解析我习惯的那种正则语法。故使用:

1
find . -regextype posix-extended -regex ".*\.(log|aux|blg)"

上述命令找出当前文件夹及子文件夹所有后缀名为log,aux,blg的文件。

几个例子

  • find . -name "*name*" - 找出当前文件夹文件名包含“name”的文件
  • find . ! -type d -print - 在当前目录查找非目录文件
  • find . -newer file1 ! file2 - 查找比 file1 新但比 file2 旧的文件
  • find -type d -empty | xargs -n 1 rmdir - 批量删除当前目录下的空文件夹
  • find -tyle l -exec ls -l {} + - 找出当前文件夹下损坏的软连接

Command grep

最基本用法:

 1
 2
 3
 4
 5
 6
 7
 8
 9
10
11
# 查找 somefile 中匹配到 something 的行
$ grep "something" somefile

# 定位 something 所在的行并将接下来的 3 行一并输出
$ grep "something" somefile -A 3

# 定位 something 所在的行并将之前的 3 行一并输出
$ grep "something" somefile -B 3

# 定位 something 所在的行并将上下 3 行一并输出
$ grep "something" somefile -C 3

使用正则表达式

grep支持三种正则:basic (BRE), extend (ERE), perl (PCRE). 不同的grep实现方式不同,详见手册。一般 extend 最为常用,语法为

1
2
# 在 somefile 中查找包含 his 或者 her 的行
$ grep -E "his|her" somefile

Ref:


Command xargs

1
2
$ whatis xargs
xargs (1)            - build and execute command lines from standard input

Ref:


Command sed


Command cut

1
2
$ whatis cut
cut (1)              - remove sections from each line of files

基本用法:

 1
 2
 3
 4
 5
 6
 7
 8
 9
10
# 以:为分隔符分割每行,并选择第 1,2,4 列输出
$ cut -d: -f1,2,4 /etc/passwd
root:x:0
bin:x:1
daemon:x:2
mail:x:12
ftp:x:11
http:x:33
nobody:x:65534
dbus:x:81

Git

创建别名

使用 git log 查看提交历史,但是输出冗杂。通常使用

1
git log --oneline --abbrev-commit --all --graph --decoreate --color

来获得更美观易读的输出。但是每次输入这么多肯定很烦人,使用

1
git config --global alias.graph "log --graph --oneline --decorate=short"

增加一个全局别名,这个别名对于任何地方的 git 都适用。如此一来,键入 git graph 会等效于

1
git log --graph --oneline --decorate=short

样例输出:

1
2
3
4
5
6
7
8
9
$ git graph

* 36f2d65 (HEAD -> master, origin/master, origin/HEAD) Forget it
* 9b4a6d7 Update ref list
* 3931d4d Using relative path for image
* ba18821 Upload pics
* ceca69a fixed reference
* be15df2 fixed picture address
* 97a36f3 Initial commit

忽略已经添加的文件

1
git rm --cached <somefiles>

推送本地分支到远程

1
2
# 远程分支如果不存在,则自动创建。
git push origin <local_brach>:<remote_branch>

拉取远程分支到本地

1
2
3
4
5
# 从远程分支切换(并创建,如果不存在)本地分支
git checkout -b <local_branch> origin/<remote_branch>

# 另:取回远程分支并创建对应的本地分支,不换自动切换到该分支
git fetch origin <remote_brach>:<local_branch>

删除 commit 历史

如果不小心将隐私信息推送至远程仓库(如 github),那么仅仅删除再更新再推送到远程仓库覆盖是不够的,别人还是可以通过你的 commit 历史查到你所做的更改,所以这种情况下必须删除之前所有的 commit history. 大致思路是创建一个孤立分支,然后重新添加文件,再删除 master 分支,将新建的分支重命名为 master,再推送到远程强制覆盖 1

 1
 2
 3
 4
 5
 6
 7
 8
 9
10
11
12
13
14
15
16
17
# Check out to a temporary branch:
git checkout --orphan TEMP_BRANCH

# Add all the files:
git add -A

# Commit the changes:
git commit -am "Initial commit"

# Delete the old branch:
git branch -D master

# Rename the temporary branch to master:
git branch -m master

# Finally, force update to our repository:
git push -f origin master

合并某个文件到当前分支

例如当前在 master 分支,希望合并某个分支 dev 的某个或多个文件到当前分支:

1
git checkout dev file1 file2 ...

但是上述做法会强行覆盖当前分支的文件,没有冲突处理,更安全的做法是先从当前分支新建分支 master_temp,然后在 master_temp 中 checkout,最后再将 master_temp 分支 merge 到 master 分支:

 1
 2
 3
 4
 5
 6
 7
 8
 9
10
11
# Create a branch based on master
git checkout -b master_temp

# Chechkout file1 from dev to master_temp
git checkout dev file1
git commit -m "checkout file1 from dev"

# Switch to master and merge, then delete
git checkout master
git merge master_temp
git branch -d master_temp

Ref: https://segmentfault.com/a/1190000008360855

Git merge

当你觉得很多时候对于一个命令的很多子命令或者选项不是很清晰,而且查了忘,忘了查,那多半是你不理解它的工作机制。或者说它对你来说不是那么自然易懂,这个时候就需要深入以下,了解以下它的基本原理,帮助自己理解,以便记忆。

git merge就是如此,你要知道 merge 的含义是什么?它其实就是在被 merge 的分支上重现要 merge 的 commits. 比如说:

a---b---c---d---e (master)
    \
     `--A---B---C (dev)

你当前在 master 分支的 e 节点,你要 merge dev 分支。其实就是将 A、B、C 三个 commit 在 master 分支上重现,仿佛 master 分支上曾经也做过这些改动。那么冲突的来源就是你在两个分支中,对同一个文件作了不同的改动,如何解决不言而喻。

小朋友,你是否有很多?

Q: 我想只重现 B 节点怎么办?
A: git checkout master && git cherry-pick 62ecb3,这里62ecb3是节点 B 的 commit 标识。

Q: 我想重现 A-B,但不要 C 怎么办?
A: git checkout -b newbranch 62ecb3 && git rebase --onto master 76cada^,这里76cada是 A 节点的 commit 标识。先基于 B 创建一个分支,这个分支包含了 A 节点的改动,然后 rebase 到 master 上去,结果就是 A 和 B 重现在 master 分支上。

Ref:

  1. https://stackoverflow.com/questions/161813/how-to-resolve-merge-conflicts-in-git
  2. Cherry-Picking specific commits from another branch

Fork 之后如何同步 fork 源的更新

1
2
3
4
5
6
# see remote status
git remote -v

# add upstream if not exist one
git remote add upstream https://github.com/<origin_owner>/<origin_repo>.git
git remote -v

从上游仓库 fetch 分支和提交点,提交给本地 master,并会被存储在一个本地分支 upstream/master

1
git fetch upstream

切换到任意分支,merge 已经 fetch 的分支即可:

1
2
git checkout somebrach
git merge upstream/master

see: https://www.zhihu.com/question/28676261

Ref:

  1. Configureing a remote for a fork
  2. Syncing a fork

从另一个分支检出某个文件并重命名

有时候开了一个孤立分支,但是想参考其他分支的代码,而当前分支又有同名文件,此时就需要从其他分支检出文件并重命名。

1
2
3
4
5
# show the content of a.cpp in specific commit HEAD^
git show HEAD^:a.cpp

# that's done
git show HEAD^:a.cpp > b.cpp

Ref: search “git-checkout older revision of a file under a new name” in stack overflow

查看已被跟踪的文件

1
git ls-files

Ref: search “how can i make git show a list of the files that are being tracked” in stack overflow

submodule

git submodule 本质上是指向一个其他仓库的链接,默认 clone 不会将 submodule 对应的仓库克隆下来。

 1
 2
 3
 4
 5
 6
 7
 8
 9
10
11
12
13
14
15
16
17
18
19
20
21
22
23
24
25
26
# help
git submodule --help

# 添加 submodule
#   1. 进入目标子文件夹
git submodule add https://github.com/imtianx/liba.git

# 更新 submodule
cd xxx
git pull
git submodule update --recursive

# 在主目录下更新 submodule liba
git submodule update --remote liba

# 删除 submodule
vim .gitmodules # 删除相应条目
vim .git/config # 删除相应条目
rm -rf .git/modules/liba # 删除对应的 git 文件夹

# 在克隆时连同 submodule 一并克隆
git clone https://github.com/imtianx/MainProject.git --recursive
# is equivalent to
git clone https://github.com/imtianx/MainProject.git
git submodule init
git submodule update

一般地,当某仓库中包含 submodule ./dir1 时,如果你只提交了 dir1 的内容,那么当前仓库是不会用上最新版本的 dir1 的。这在远程仓库中尤为显著。我的博客文件夹 BlogHugo 中包含了 themes/even 的 submodule, 每当我在 even 中改完样式推送到远端后(这里我 BlogHugo 仓库没有任何修改),发现 build 出来的网站压根没有使用最新的 submodule 里面的内容。究其原因,其实是父仓库默认会跟踪 submodule 的一个版本号。如果不在父仓库中显示更新要跟踪的版本号,则父仓库一直会跟踪之前的版本号。这是合理的,因为父子仓库独立开发,为了避免子仓库(submodule)的频繁提交对父仓库的构建产生影响,所以默认会跟踪一个版本号。

正确的做法是,当 submodule 更新后,父仓库中 submodule 的版本号会产生一个修改,在父仓库中 add-commit 这个修改,就可以更新父仓库中引用的 submodule 版本号。

Ref:

  1. Git-工具 - 子模块
  2. Git 子模块:git submodule

如何撤销本地 commit

有时候本地 add 了一写 diff,随手 commit 了,接着又有些 diff 可以共用这个 commit,就想撤销刚刚的 commit,把所有的 diff 合并在一起作为一次 commit。

1
2
# for more info, type git reset -h
git reset --soft <commit_id>

修改已提交的 commit message

 1
 2
 3
 4
 5
 6
 7
 8
 9
10
11
12
13
14
15
16
17
18
19
20
21
22
# commit_id 至少比要修改的那个 commit 早一个版本
git rebase -i <commit_id>

# 列出 rebase 的 commit 列表,不包含 <commit id>
$ git rebase -i <commit id>
# 最近 3 条
$ git rebase -i HEAD~3
# 本地仓库没 push 到远程仓库的 commit 信息
$ git rebase -i

# vi 下,找到需要修改的 commit 记录,`pick` 修改为 `edit` 或 `e`,`:wq` 保存退出
# 或者较新版本的 `reword`
# 重复执行如下命令直到完成
$ git commit --amend --message="modify message by daodaotest" --author="jiangliheng <jiang_liheng@163.com>"
$ git rebase --continue

# 中间也可跳过或退出 rebase 模式
$ git rebase --skip
$ git rebase --abort

# 如果只是更改 last commit
git commit --amend

Cf. github doc.

Git rebase

Cf. https://www.atlassian.com/git/tutorials/rewriting-history/git-rebase

rebasemerge都是将另一分支的提交(commit)集成到当前分支的方法。而 merge 会保留两条分支的所有 commit,然后解决冲突,然后形成一个 merge commit,从 git log 上来看,原本线性的提交历史分了叉,然后又合了并。而 rebase 则是基于当前分支的某次提交去重现另一个分支,rebase 之后依然能够保留提交历史的线性状态。

a---b---c---d---e (master)
    \
     `--A---B---C (dev)

From a content perspective, rebasing is changing the base of your branch from one commit to another making it appear as if you’d created your branch from a different commit. Internally, Git accomplishes this by creating new commits and applying them to the specified base. It’s very important to understand that even though the branch looks the same, it’s composed of entirely new commits.

The primary reason for rebasing is to maintain a linear project history. For example, consi der a situation where the main branch has progressed since you started working on a feature branch. You want to get the latest updates to the main branch in your feature branch, but you want to keep your branch’s history clean so it appears as if you’ve been working off the latest main branch.

You have two options for integrating your feature into the main branch: merging directly or rebasing and then merging. The former option results in a 3-way merge and a merge commit, while the latter results in a fast-forward merge and a perfectly linear history. The following diagram demonstrates how rebasing onto the main branch facilitates a fast-forward merge.

Rebasing is a common way to integrate upstream changes into your local repository. Pulling in upstream changes with Git merge results in a superfluous merge commit every time you want to see how the project has progressed. On the other hand, rebasing is like saying, “I want to base my changes on what everybody has already done.”

注:写这个的时候,我自己对 rebase 的理解也很模糊。

任何时候不清楚的时候请终止 rebase:

1
git rebase --abort

反复操练几次,git 有友好的提示信息。

撤销上次rebase

1
2
3
4
5
# 先使用 reflog查看分支变动历史
$ git reflog

# 选中rebase前的commit id (hash)
$ git reset --hard <commit_id>

参考:此处


Command g++

自定义包含路径

1
g++ main.cpp -I/usr/local/include

自定义链接静态或动态库

1
2
g++ main.cpp -L/path/to/lib_file
g++ main.cpp -L/usr/lib64 -lcurl -lssl

上面第二个命令链接了/usr/lib64/目录下的libcurl.solibssl.so两个动态库文件。静态库也是同样链接。说起来静态库,想起了最近折腾的一个东西,你可能会想把多个静态库合成一个静态库,想当然的直接用ar合并,但是不行,必须要把两个静态库全解压出来,再合并所有的 object file. 参见:here

生成机器码

1
g++ main.cpp -c

生成汇编代码

1
g++ main.cpp -S

仅预编译

1
g++ main.cpp -E > main.i

Aria2c

aria2c 是个好东西。支持连接,磁力,种子下载。轻量且强大,可直接使用,也可作为服务端,配合 WebUI 使用。

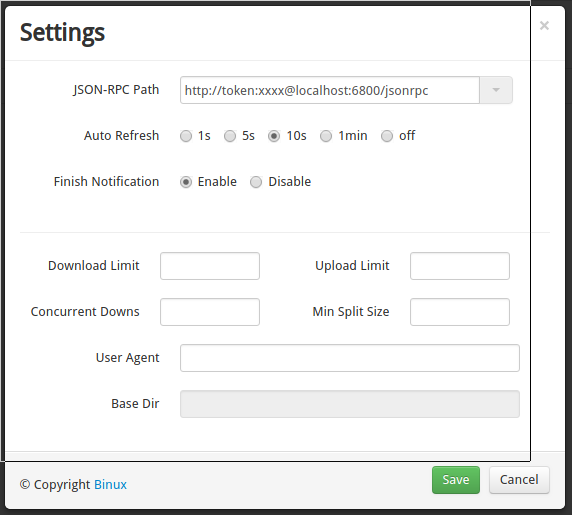
Note: jsonrpc 地址格式为 http://token:<rpc-secret>@hostname:port/jsonrpc 令牌填写自己设置的 rpc-secret

xxx 替换为自己设置的 rpc-secret
MPV

MPV 是一个轻量、简约、跨平台的播放器。据我自己体验,在 Linux 下比 mplayer 播放效果要好,mplayer 倍速会掉帧,而 mpv 则不太明显。

HTML

给网页添加 BGM。

1
<embed src="bgm.mp3" autostart="true" loop="true" width="300" height="20" hidden="true">

又,添加可以控制播放的音乐。

1
<audio autoplay="autoplay" controls="controls" loop="loop" preload="auto" src="music.mp3">Your browser doesn't support H5 audio flag!</audio>

使用xrandr设置多屏显示

 1
 2
 3
 4
 5
 6
 7
 8
 9
10
11
12
13
14
15
16
17
18
19
20
21
22
23
24
25
26
27
28
29
30
31
32
33
34
35
36
37
38
39
40
41
42
43
44
45
46
47
48
49
50
51
52
53
54
55
56
57
58
$ xrandr
Screen 0: minimum 320 x 200, current 1920 x 1080, maximum 8192 x 8192
eDP-1 connected primary 1920x1080+0+0 (normal left inverted right x axis y axis) 294mm x 165mm
   1920x1080     59.93*+
   1680x1050     59.95    59.88
   1400x1050     59.98
   1600x900      59.99    59.94    59.95    59.82
   1280x1024     60.02
   1400x900      59.96    59.88
   1280x960      60.00
   1440x810      60.00    59.97
   1368x768      59.88    59.85
   1280x800      59.99    59.97    59.81    59.91
   1280x720      60.00    59.99    59.86    59.74
   1024x768      60.04    60.00
   960x720       60.00
   928x696       60.05
   896x672       60.01
   1024x576      59.95    59.96    59.90    59.82
   960x600       59.93    60.00
   960x540       59.96    59.99    59.63    59.82
   800x600       60.00    60.32    56.25
   840x525       60.01    59.88
   864x486       59.92    59.57
   700x525       59.98
   800x450       59.95    59.82
   640x512       60.02
   700x450       59.96    59.88
   640x480       60.00    59.94
   720x405       59.51    58.99
   684x384       59.88    59.85
   640x400       59.88    59.98
   640x360       59.86    59.83    59.84    59.32
   512x384       60.00
   512x288       60.00    59.92
   480x270       59.63    59.82
   400x300       60.32    56.34
   432x243       59.92    59.57
   320x240       60.05
   360x202       59.51    59.13
   320x180       59.84    59.32
DP-1 disconnected (normal left inverted right x axis y axis)
HDMI-1 disconnected (normal left inverted right x axis y axis)
HDMI-2 connected 1920x1080+0+0 (normal left inverted right x axis y axis) 527mm x 296mm
   1920x1080     60.00*+  60.00    50.00    59.94
   1920x1080i    60.00    60.00    50.00    59.94
   1600x1200     60.00
   1280x1024     75.02    60.02
   1152x864      75.00
   1280x720      60.00    60.00    50.00    59.94
   1024x768      75.03    60.00
   800x600       75.00    60.32
   720x576       50.00    50.00
   720x576i      50.00    50.00
   720x480       60.00    60.00    59.94    59.94    59.94
   720x480i      60.00    60.00    59.94    59.94
   640x480       75.00    60.00    59.94    59.94
   720x400       70.08

观察输出可知,连接了两个显示器 (eDP-1, HDMI-2),其中 eDP-1 是主显示器。如果第二块屏幕无显示,执行下面的命令。

1
xrandr --output HDMI-2

又,指定分辨率为 1920x1080,

1
xrandr --output HDMI-2 --mode 1920x1080

又,设置为右侧扩展屏,即光标向右可移动至第二块屏,

1
xrandr --output HDMI-2 --right-of eDP-1

又,连接上第二块屏,想关掉内置显示屏,(警告:不要随便关掉内置屏)

1
xrandr --output eDP-1 --off

又,开启内置屏。

1
xrandr --output eDP-1 --auto

某些情况下会无法检测显示器的最大分辨率,此时需要手动设置显示器的分辨率。参考此处

 1
 2
 3
 4
 5
 6
 7
 8
 9
10
11
12
13
# 获取参数值
$ cvt 2560 1440
# 2560x1440 59.96 Hz (CVT 3.69M9) hsync: 89.52 kHz; pclk: 312.25 MHz
Modeline "2560x1440_60.00"  312.25  2560 2752 3024 3488  1440 1443 1448 1493 -hsync +vsync

# 新建 mode
$ xrandr --newmode "2560x1440_60.00"  312.25  2560 2752 3024 3488  1440 1443 1448 1493 -hsync +vsync

# 为指定显示设备 add mode
$ xrandr --addmode HDMI2 "2560x1440_60.00"

# 指定显示器分辨率
$ xrandr --output HDMI2 --mode "2560x1440_60.00"

如果显示屏分辨率更改成功但窗口显示不完整(即只有左上角以指定分辨率显示,其他部分空白),可以尝试关闭内置显示屏,此时显示器应该能以完整窗口显示内容。


网络

查看被监听端口

1
netstat -tulpn | grep LISTEN

Htop 基本操作

Htop 类似于 top,但比 top 更现代化,支持鼠标操作,支持颜色主题。在命令行键入 htop,会呈现如下界面。(图片来源:https://blog.csdn.net/freeking101/article/details/79173903)
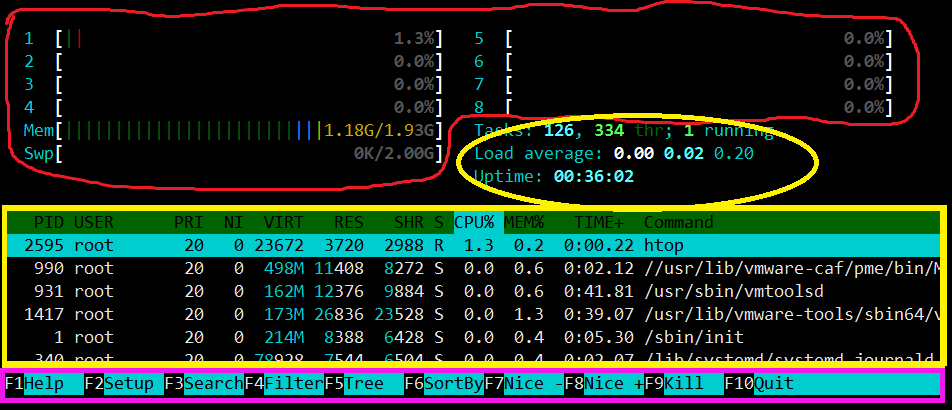
平均负载区的三个数字分别表示过去 5、10、15 分钟系统的平均负载。进程区每一列的意义分别是:

  • PID: 进程号
  • USER: 进程所有者的用户名
  • PRI: 优先级别
  • NI: NICE 值(优先级别数值),越小优先级越高
  • VIRT: 虚拟内存
  • RES: 物理内存
  • SHR: 共享内存
  • S: 进程状态(S[leep], R[unning], Z[ombie], N 表示优先级为负数)
  • CPU%: 该进程占用的 CPU 使用率
  • MEM%: 该进程占用的物理内存和总内存的百分比
  • TIME+: 该进程启动后占用的 CPU 时间
  • Command: 该进程的启动命令

常用快捷键可在 htop 界面按?显示。

  • H: 显示/隐藏用户子线程
  • Space: 标记进程
  • k: 杀死已标记进程

Reference