如无特殊声明:本文所有 UML 图均出自《图说设计模式》。在此特别鸣谢!
Singleton
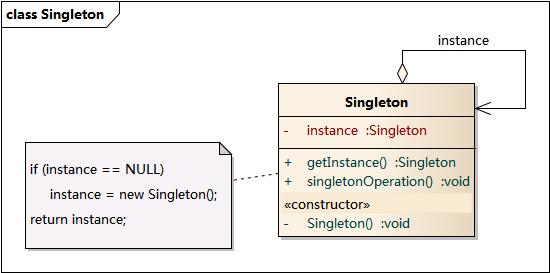
单例模式解决了全局变量的问题,全局只能创建一个实例,保证任何请求该实例的调用均返回同一个对象,保证不会被意外析构。

 1
 2
 3
 4
 5
 6
 7
 8
 9
10
11
12
13
14
15
16
17
18
19
20
21
22
23
24
25
26
27
28
29
| // A singleton class
// c.f. https://zhuanlan.zhihu.com/p/37469260
/**
* This is so-called lazy-singleton, since it creates the
* instance until you ask for it.
*
* However, it may cause memory leak, since you have no
* way to delete the instance you created.
*/
class SingletonV1
{
public:
static SingletonV1* GetInstance()
{
if (pinstance_ == nullptr)
pinstance_ = new SingletonV1();
return pinstance_;
}
private:
SingletonV1() = default;
~SingletonV1() = default;
SingletonV1(const SingletonV1&) = delete;
SingletonV1& operator=(const SingletonV1&) = delete;
private:
static SingletonV1* pinstance_;
};
// static member initialization
SingletonV1* SingletonV1::pinstance_ = nullptr;
|
 1
 2
 3
 4
 5
 6
 7
 8
 9
10
11
12
13
14
15
16
17
18
19
20
21
22
23
24
25
26
27
28
29
30
31
32
33
34
35
36
37
38
39
40
41
42
43
44
| #include <iostream>
#include <mutex>
using namespace std;
std::mutex gm;
/**
* This is also a lazy-singleton, but it's thread-safe.
* It is so-called Double-Checked Locking Pattern (DCL).
*/
class SingletonV2
{
public:
static SingletonV2* GetInstance()
{
if (pinstance_ == nullptr)
{
// Attention here: see if >= 2 threads meets here,
// only one thread can hold the mutex, then create
// the instance, this is can only occur on your first
// request on instance, once the instance is created,
// we can return it immediately.
std::lock_guard<std::mutex> lk(gm);
// See why double check here?
// Cause if >= 2 threads have already run across here,
// they've waited and finally held the mutex, w/o this
// check, all of these threads will create a instance,
// that's not what you want.
if (pinstance_ == nullptr) // double check
pinstance_ = new SingletonV2();
}
return pinstance_;
}
private:
SingletonV2() = default;
~SingletonV2() = default;
SingletonV2(const SingletonV2&) = delete;
SingletonV2& operator=(const SingletonV2&) = delete;
private:
static SingletonV2* pinstance_;
};
// static member initialization
SingletonV2* SingletonV2::pinstance_ = nullptr;
|
 1
 2
 3
 4
 5
 6
 7
 8
 9
10
11
12
13
14
15
16
17
18
19
20
| /**
* C++11 ensures the mt-safety of local static object. Taking
* the advantage of this, <<Effective C++>> provides us an elegant
* implemention of mt-safe singleton.
*/
class SingletonV3
{
public:
static SingletonV3* GetInstance()
{
// Note that instance will be created only at the first time.
static SingletonV3 instance;
return &instance;
}
private:
SingletonV3() = default;
~SingletonV3() = default;
SingletonV3(const SingletonV3&) = delete;
SingletonV3& operator=(const SingletonV3&) = delete;
};
|
 1
 2
 3
 4
 5
 6
 7
 8
 9
10
11
12
13
14
15
16
17
18
19
20
21
22
23
24
25
26
| /**
* This is an eager-singleton which create an instance at first,
* then return it as required.
*
* It's mt-safe since the instance initiliazation is before main()
* function.
*/
class SingletonV4
{
public:
static SingletonV4* GetInstance()
{
return &instance_;
}
private:
SingletonV4() = default;
~SingletonV4() = default;
SingletonV4(const SingletonV4&) = delete;
SingletonV4& operator=(const SingletonV4&) = delete;
private:
// note that here is not a pointer, since a pointer will not own
// a memory range by default.
static SingletonV4 instance_;
};
// initialize the static member
SingletonV4 SingletonV4::instance_;
|
Factory
工厂模式将对象的创建和对象本身的业务分离,适合那些不关心对象如何创建,对象的创建相对独立的情形。工厂模式又分三种,谓之工厂三兄弟:
- Simple Factory
- Factory Method
- Abstract Factory
Simple Factory
简单工厂模式就是有一个工厂类,你给我什么参数我就给你创造什么对象。

 1
 2
 3
 4
 5
 6
 7
 8
 9
10
11
12
13
14
15
16
17
18
19
20
21
22
23
24
25
26
27
28
29
30
31
32
33
34
35
36
37
38
39
40
41
42
43
44
45
46
47
48
49
50
51
52
53
54
55
56
57
58
59
60
61
| // This file implements a demo for simple factory pattern.
//
#include <cstdio>
#include <string>
#define PRINT_NAME printf("%s\n", __FUNCTION__)
using namespace std;
class Product // abstract product
{
public:
virtual ~Product() { PRINT_NAME; }
public:
virtual void Operation() = 0;
};
class ProductA : public Product // concrete product
{
public:
~ProductA() { PRINT_NAME; }
public:
void Operation() override { printf("%s\n", "A::Operation()"); }
};
class ProductB : public Product // concrete product
{
public:
~ProductB() { PRINT_NAME; }
public:
void Operation() override { printf("%s\n", "B::Operation()"); }
};
class Factory // factory
{
public:
~Factory() { PRINT_NAME; }
public:
static Product* CreateProduct(const string& name)
{
if (name == "A")
return new ProductA();
else if (name == "B")
return new ProductB;
else
return nullptr;
}
};
///
int main()
{
Product* pa = Factory::CreateProduct("A");
Product* pb = Factory::CreateProduct("B");
pa->Operation();
pb->Operation();
delete pb;
delete pa;
return 0;
}
|
Factory Method
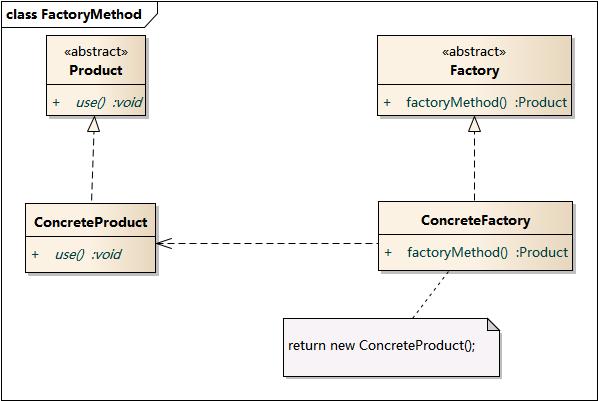
工厂方法模式,是指有一个抽象工厂,他不负责实际的创建任务,所有不同类型的对象由其不同的子类创建。

 1
 2
 3
 4
 5
 6
 7
 8
 9
10
11
12
13
14
15
16
17
18
19
20
21
22
23
24
25
26
27
28
29
30
31
32
33
34
35
36
37
38
39
40
41
42
43
44
45
46
47
48
49
50
51
52
53
54
55
56
57
58
59
60
61
62
63
64
65
66
67
68
69
70
71
72
73
74
75
76
77
78
79
80
81
| #include <cstdio>
#define PRINT_NAME printf("%s\n", __FUNCTION__)
class Product
{
public:
virtual ~Product() { PRINT_NAME; }
public:
virtual void Operation() = 0;
};
class ProductA : public Product
{
public:
~ProductA() { PRINT_NAME; }
public:
void Operation() override
{
printf("%s\n", "ProductA::Operation()");
}
};
class ProductB : public Product
{
public:
~ProductB() { PRINT_NAME; }
public:
void Operation() override
{
printf("%s\n", "ProductB::Operation()");
}
};
class Creator
{
public:
virtual ~Creator() { PRINT_NAME; }
public:
virtual Product* CreateProduct() = 0;
};
class CreatorA : public Creator
{
public:
~CreatorA() { PRINT_NAME; }
public:
Product* CreateProduct() override
{
return new ProductA();
}
};
class CreatorB : public Creator
{
public:
~CreatorB() { PRINT_NAME; }
public:
Product* CreateProduct() override
{
return new ProductB();
}
};
// test
int main()
{
Creator* ca = new CreatorA;
Product* pa = ca->CreateProduct();
pa->Operation();
Creator* cb = new CreatorB;
Product* pb = cb->CreateProduct();
pb->Operation();
delete pb;
delete cb;
delete pa;
delete ca;
return 0;
}
|
Abstract Factory
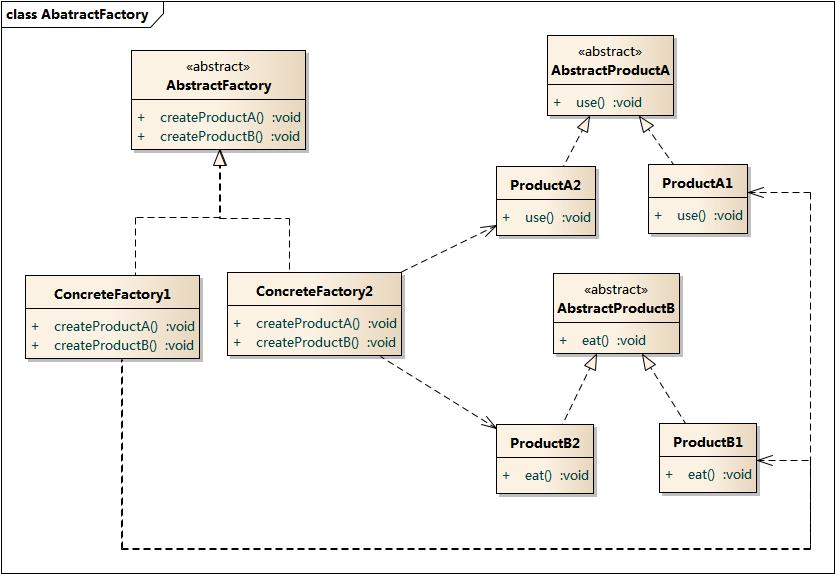
抽象工厂模式,是指有一个抽象工厂,他不负责实际的创建任务。它会有很多个子类,每个子类负责创建一族具有某种特定属性的对象。如果把工厂所需要创建的对象称为产品,同样有一个抽象产品,他有多个子类,代表不同产品,但每一个产品又有不同属性。所以,把具有相同属性的所有产品的创建任务交给一个工厂(抽象工厂的一个子类),把具有另一个属性的所有产品的创建任务交给另一个工厂(抽象工厂的另一个子类)。

  1
  2
  3
  4
  5
  6
  7
  8
  9
 10
 11
 12
 13
 14
 15
 16
 17
 18
 19
 20
 21
 22
 23
 24
 25
 26
 27
 28
 29
 30
 31
 32
 33
 34
 35
 36
 37
 38
 39
 40
 41
 42
 43
 44
 45
 46
 47
 48
 49
 50
 51
 52
 53
 54
 55
 56
 57
 58
 59
 60
 61
 62
 63
 64
 65
 66
 67
 68
 69
 70
 71
 72
 73
 74
 75
 76
 77
 78
 79
 80
 81
 82
 83
 84
 85
 86
 87
 88
 89
 90
 91
 92
 93
 94
 95
 96
 97
 98
 99
100
101
102
103
104
105
106
107
108
109
| // This file implements a demo of abstract factory pattern.
//
#include <cstdio>
#define PRINT_NAME printf("%s\n", __FUNCTION__)
// cats
class Cat
{
public:
virtual ~Cat() { PRINT_NAME; }
public:
virtual void Meow() = 0;
};
class BlackCat : public Cat
{
public:
~BlackCat() { PRINT_NAME; }
public:
void Meow() override { printf("%s\n", "b::meow~"); }
};
class WhiteCat : public Cat
{
public:
~WhiteCat() { PRINT_NAME; }
public:
void Meow() override { printf("%s\n", "w::meow~"); }
};
// dogs
class Dog
{
public:
virtual ~Dog() { PRINT_NAME; }
public:
virtual void Bark() = 0;
};
class BlackDog : public Dog
{
public:
~BlackDog() { PRINT_NAME; }
public:
void Bark() override { printf("%s\n", "b::wang~"); }
};
class WhiteDog : public Dog
{
public:
~WhiteDog() { PRINT_NAME; }
public:
void Bark() override { printf("%s\n", "w::wang~"); }
};
// here comes factory
class Factory
{
public:
virtual ~Factory() { PRINT_NAME; }
public:
virtual Cat* CreateCat() = 0;
virtual Dog* CreateDog() = 0;
};
class BlackFactory : public Factory // factory that dyes animals black
{
public:
~BlackFactory() { PRINT_NAME; }
public:
Cat* CreateCat() override { return new BlackCat(); }
Dog* CreateDog() override { return new BlackDog(); }
};
class WhiteFactory : public Factory // factory that dyes animals white
{
public:
~WhiteFactory() { PRINT_NAME; }
public:
Cat* CreateCat() override { return new WhiteCat(); }
Dog* CreateDog() override { return new WhiteDog(); }
};
///
int main()
{
Factory* pblack = new BlackFactory();
Factory* pwhite = new WhiteFactory();
Cat* black_cat = pblack->CreateCat();
Cat* white_cat = pwhite->CreateCat();
Dog* black_dog = pblack->CreateDog();
Dog* white_dog = pwhite->CreateDog();
black_cat->Meow();
black_dog->Bark();
white_cat->Meow();
white_dog->Bark();
delete white_dog;
delete black_dog;
delete white_cat;
delete black_cat;
delete pwhite;
delete pblack;
return 0;
}
|
Observer
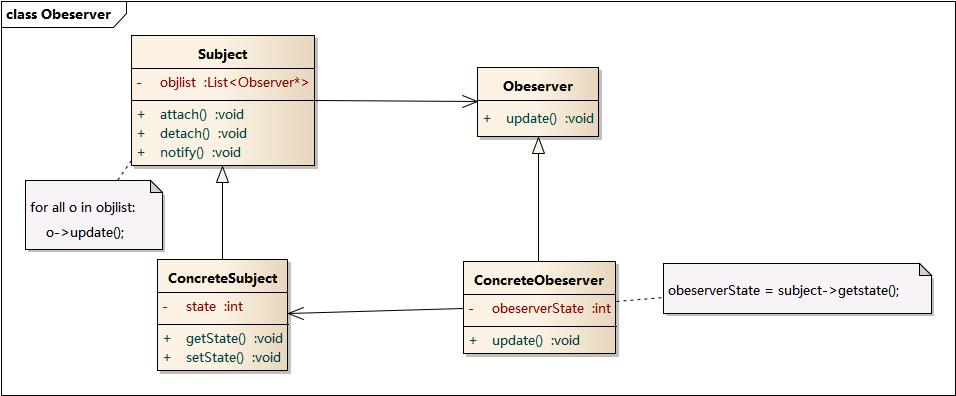
观察者模式很重要,在计算机系统里有大量应用。就是说有一群观察者,希望观察某个目标,进而相应的动作。比方说很多人需要了解天气预报的信息,那么天气预报就是观察目标,如果人们知道天气预报说下雨,那么他可能会带把伞。这就是相应的操作。如何更新目标的状态是个很有意思的问题。常见的有两种,一是观察目标发生变化,主动通知所有的观察者;而是观察者不断轮询,监听观察目标,一旦发生变化,立刻做出相应的动作。前者称为 reactor,后者称为 proactor. 两种方式各有所用!比方说,如果订阅天气预报的人数寥寥无几,那么气象站完全可以向所有订阅者推送天气更新信息,但是如果全国上亿人都订阅了天气预报,那么此时完全推送可能就代价太大了。而有些订阅者,他时刻关注天气,比如地方气象站,而有些订阅者,他对实时性不要求那么高,比方说天气预报 APP(通常 1-2 小时更新一次),对于这两种不同的订阅者,很显然需要两种不同的更新方式:前者轮询,后者推送。

  1
  2
  3
  4
  5
  6
  7
  8
  9
 10
 11
 12
 13
 14
 15
 16
 17
 18
 19
 20
 21
 22
 23
 24
 25
 26
 27
 28
 29
 30
 31
 32
 33
 34
 35
 36
 37
 38
 39
 40
 41
 42
 43
 44
 45
 46
 47
 48
 49
 50
 51
 52
 53
 54
 55
 56
 57
 58
 59
 60
 61
 62
 63
 64
 65
 66
 67
 68
 69
 70
 71
 72
 73
 74
 75
 76
 77
 78
 79
 80
 81
 82
 83
 84
 85
 86
 87
 88
 89
 90
 91
 92
 93
 94
 95
 96
 97
 98
 99
100
101
102
103
104
105
106
107
108
109
110
111
112
113
114
115
116
117
118
119
120
121
122
123
124
125
| // This file implements a demo of observer pattern.
//
#include <cstdio>
#include <list>
#include <string>
#define PRINT_NAME printf("%s\n", __FUNCTION__)
// front declaration
class Subject;
class Observer;
class Subject
{
public:
virtual ~Subject() { PRINT_NAME; }
public:
virtual void attach(Observer* ob);
virtual void detach(Observer* ob);
virtual void notify(); // notify all observers
virtual void set_state(int state) = 0;
virtual int get_state() = 0;
private:
std::list<Observer*> observers_;
};
class Observer
{
public:
virtual ~Observer() { PRINT_NAME; }
public:
virtual void update(Subject* sb) = 0;
};
//================ impl subject ==============
void Subject::attach(Observer* ob) { observers_.push_back(ob); }
void Subject::detach(Observer* ob)
{
for (auto it = observers_.begin(); it != observers_.end(); ++it)
{
if (*it == ob)
{
observers_.erase(it);
break;
}
}
}
void Subject::notify()
{
for (auto ob : observers_)
ob->update(this);
}
/* a specific subject */
class Weather : public Subject
{
public:
~Weather() { PRINT_NAME; }
public:
void set_state(int s) override { state_ = s; }
int get_state() override { return state_; }
private:
int state_;
};
/* a specific observer */
class WeatherAPP : public Observer
{
public:
WeatherAPP(const std::string& name): name_(name) {}
~WeatherAPP() { PRINT_NAME; }
public:
void update(Subject* sb) override
{
state_ = sb->get_state();
printf("Observer %s: ", name_.data());
switch (state_)
{
case 0: printf("default\n");
break;
case 1: printf("rainy\n");
break;
case 2: printf("cloudy\n");
break;
case 3: printf("foggy\n");
break;
default: break;
}
}
private:
int state_;
std::string name_;
};
///
int main()
{
Subject* weather = new Weather();
Observer* ob1 = new WeatherAPP("Color TianQi");
Observer* ob2 = new WeatherAPP("Moji TianQi");
weather->attach(ob1);
weather->attach(ob2);
weather->set_state(1); // rainy
weather->notify();
weather->detach(ob2);
weather->set_state(3); // foggy
weather->notify();
delete ob2;
delete ob1;
delete weather;
return 0;
}
|
References
- 图说设计模式
Author
Yychi
LastMod
November 2, 2024
(d7af47e8)
License
CC BY-NC-ND 4.0


